Python Made Easy: Your Step-by-Step Journey with ChatGPT
I'm an "old-school" Software Engineer, mostly specializing in C# and .NET.
Currently in the process of discovering AI and Machine Learning.
Whether you're a seasoned Microsoft tech stack developer or just starting out, this tutorial is the ideal place to begin your Python journey. And, to sweeten things up a little bit, you're going to use ChatGPT to help you get started!
Without further ado, let's dive into the tutorial and start learning Python!
Step #1 - Install Python
First, download the latest version of Python for Windows from the Python Downloads page.
Execute the downloaded installer package.
In the Python installer UI, take the quick path by clicking on the Install now button. Be sure to check the "Add python.exe to PATH" option, as this will at a later point make it possible to execute python and pip from the command line.

Once installed, proceed to the next step to get the development environment ready.
Step #2 - Install Visual Studio Code
We'll be using Visual Studio Code as our Python programming playground. VS Code is my go-to development environment for open-source development languages. Read more about it in my previous blog post 5 Awesome Visual Studio Code Features.
Download VS Code from code.visualstudio.com.
Run the installer, accepting default installation options.
Once the installation finishes, open Visual Studio Code to set up the necessary extensions.
Step #3 - Install Python Extensions
If you're new to Visual Studio Code, I recommend going through some basic usage tutorials first. The Getting Started section of the official VS Code documentation seems like a great place to start learning.
To get syntax highlighting, IntelliSense and debugging support for Python scripts, we'll need to install some Visual Studio Code extensions.
Open the Extensions panel
Search for "python"
The first extension found should be Python (by Microsoft).
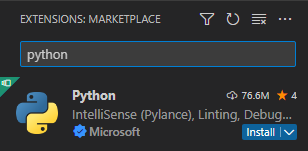
Click Install to install the extension.
You're now set up to start writing your first python script!
Step #4 - Our Very First Python Script
Before we delve into writing Python code, let's create a very basic "project" for the code files. In Visual Studio Code, the easiest way how to do this is to open a folder on your local drive:
In VS Code, go File->Open Folder
Open a folder on your drive, for example,
C:\Dev\PythonTest.When prompted, click "Yes, I trust the authors".
In the File Explorer panel, click on the New File icon and specify
test1.pyas the name of the new python file.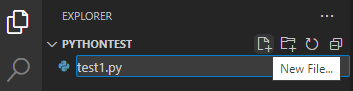
Add the following content to the file and save:
print("Hello!")
We're now ready to run and debug our python script for the first time!
Step #5 - Debug and Run
As with most programming languages, there are two basic ways how to execute scripts written in Python: Debug and Run.
To Debug the Python script in Visual Studio Code, go Run->Start Debugging, or press F5.
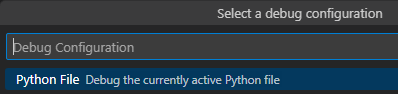
The first time you do this, you will be asked to select a debug configuration. Pick the "Debug File - Debug the currently active Python file" configuration. This option is sufficient for our simple tests. For more complex debugging scenarios, check out the Python debugging in VS Code documentation.
To Run the Python script in Visual Studio Code, go Run->Run Without Debugging, or press Ctrl+F5.
In both cases, you should get the following Output written into the VS Code Terminal window:
Hello!
Voila, you just executed your very first Python script!
Step #6 - Get Your Code on with ChatGPT Code Snippets
Being inspired by a recent post of a fellow blogger Jens Caasen and his article 12 ways to make ChatGPT your personal Junior Developer (with examples), I've decided to ask ChatGPT to help us come up with some fun introductory Python code snippets.
Utilizing ChatGPT to get you started with Python is a great choice for (at least) two reasons:
You can quickly get sample code for topics that interest you, for example: For loops, JSON, Rest API, etc.
You get to sharpen your ChatGPT usage skills. ChatGPT and AI in general are the future and the faster we adopt (and accept) it, the bigger competitive advantage we'll get!
Snippet #1: 99 Bottles of Beer on the Wall
For starters, we're going to ask for some very basic Python sample code:
Me: what would be a useful but fun snippet of Python code for someone who's very new to the Python language?
for i in range(99, 0, -1):
    print(f"{i} bottles of beer on the wall, {i} bottles of beer.")
    print(f"Take one down, pass it around, {i - 1} bottles of beer on the wall.")
ChatGPT: This code snippet uses a for loop and the range() function to count down from 99 to 1, and the print() function to print the lyrics of the song. It also makes use of string interpolation (f"{...}") to insert dynamic values into the string being printed. This code snippet is a simple example of how you can use Python to automate repetitive tasks and generate fun output!
(emphasis mine)
Snippet #2: How Tall Are You?
This time we ask for a sample illustrating a specific language construct:
Me: something illustrating the if/else condition?
height = float(input("Enter your height in meters: "))

if height >= 1.8:
    print("You are tall!")
else:
    print("You are not tall.")
ChatGPT: This code snippet uses an if statement and an else clause to determine if a person's height is greater than or equal to 1.8 meters. If the height is greater than or equal to 1.8, the code will print "You are tall!"; otherwise, it will print "You are not tall.". This simple code snippet demonstrates how you can use the if statement and the else clause in Python to make decisions based on conditions.
Snippet #3: List of European countries using REST and JSON
Now let's try something a little more complex:
Me: How about an example importing a library, reading a publicly available json file containing world countries and then listing all European countries?
import requests
import json

response = requests.get("https://restcountries.com/v3.1/all")
countries = json.loads(response.text)

european_countries = [country["name"]["common"] for country in countries if country["region"] == "Europe"]

print("European Countries:")
for country in european_countries:
    print("-", country)
ChatGPT: This code snippet first imports the requests library, which allows you to send HTTP requests, and the json library, which provides functions for encoding and decoding JSON data. It then uses the requests.get() function to send a GET request to the endpoint "https://restcountries.com/v3.1/all" to retrieve information about all countries in the world. The json.loads() function is then used to parse the JSON data returned in the response.
Next, the code uses a list comprehension to create a list of common names of countries located in the region "Europe". Finally, the code uses a for loop and the print() function to print the names of all European countries.
This code snippet demonstrates how you can use the requests and json libraries to retrieve information from a publicly available API and process the data in Python.
Good. However, with the default setup of Python and Visual Studio Code that we've established, this example does not work:

Let's ask ChatGPT to fix it:
Me: I'm getting an error saying: Import "requests" could not be resolved
ChatGPT: It seems like you don't have the requests library installed in your Python environment. You can install it using the following command:
pip install requests
Make sure you have the pip package manager installed, and run the command in your terminal or command prompt. After the installation is complete, you should be able to import the requests library in your Python code.
And indeed, as suggested, once we install the requests library using the pip package manager, the code works and outputs a list of European countries.
Great job, ChatGPT! 👏👏
That's a Wrap
I could be going on with the examples for hours, most likely learning something new with every new code snippet generated by ChatGPT.
However, let's leave some room for your own experimenting.
And don't forget to share any fun or interesting content that you and ChatGPT come up with in the comments!